Showing posts with label science for kids. Show all posts

Saturday, January 19, 2013

More Fun Kid Science

I really do love doing science projects with my kids, we keep it simple so that they can fully understand the process. They're always amazed with the things we do. I don't just do science projects with the kids either, though they are my favorite because to them, it's like magic. Really from a psychological point of view, Bubba tends to enjoy the science projects and chemical reactions a bit more than the girls do. To me, that's evidence in itself as to why boys do tend to do better than girls in Science class. It's just more understandable to them I suppose. Maybe it's just that they're more into blowing stuff up and making messes. Snakes and snails and puppy dog tails and all that. Several of my friends have really liked the other kid science projects I've posted and linked to so I thought I would do another one, here it is.


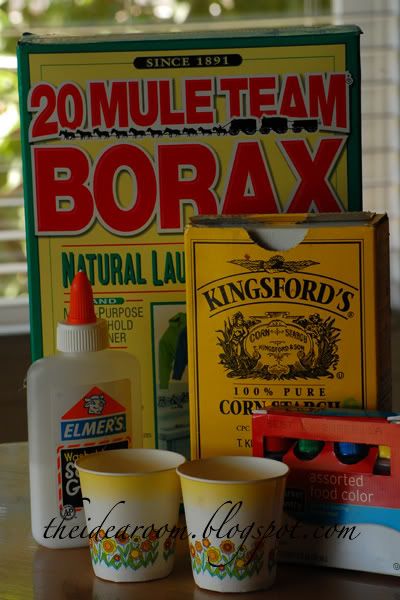
Bouncy Balls:
  • 1/2 tsp Borax (found in laundry section) You may have some left over if you made the laundry detergent.
  • 2 TBS warm water
  • 1 TBS corn starch
  • 1TBS glue (clear glue makes a see transparent ball and white glue makes an opaque ball)
  • 2 small mixing bowls or cups
  • a stirring stick (plastic spoon)
  • food coloring (optional)
mix together the warm water and borax till the borax dissolves. In your other mixing bowl/cup add the glue, 1 tsp of the borax/water solution you just made and the cornstarch. Wait 10-15 seconds before stirring. Rolls around in your hands once mixed until it forms a not so sticky ball. This will dry out after a couple of days but it's a fun project. You can add the food coloring with the borax/water mixture for a solid bouncy ball or wait till the last second after you've mixed everything to create a swirly effect like the ones you buy- just don't over stir the food coloring or it will completely blend and become solid.


Acid Based Reaction to Blow Up a Balloon:
  • baking soda
  • vinegar
  • small funnels
  • empty bottle like a soda or water bottle
Fill empty bottle(s) about 1/3 of the way full with vinegar. Use your funnel to fill your balloon about half way full with baking soda. Attach the lip of the balloon to the top of your bottle- be careful not to spill your baking soda yet. Have your child hold the balloon to the bottle and then, when you're ready, have your child lift up the balloon- dropping the baking soda into the vinegar. This creates an acid based reaction that creates carbon dioxide to fill the balloon. It's not helium and it's pretty much the same thing as blowing them up yourself.


Density Project:
  • 1/4 c. dish washing liquid
  • 1/4 c. vegetable oil
  • 1/4 c. vinegar
  • 1/4 c. karo syrup
  • 1/4 c. honey
  • 1/4 c. rubbing alcohol
Carefully pour these one at a time into a bottle, using a funnel. You want these to try to hit dead center without touching the sides. Each of these things will layer together. Seal your bottle with an air tight lid and shake it. Watch and see how long it takes each to separate, if they do.


Hot/Cold Balloon:

For this project you're learning how the air around us will expand and contract when exposed to hot and cold conditions. You could even use the balloons you blow up from the project above. Your tires do the same thing by the way, that's why it's important to know how to air up your tires.

First you'll need to measure your balloon at room temperature. A fabric measuring tape works best for this, which you can find in your sewing/fabric aisles- that's what they're normally used for. Mark down your measurements throughout the project.

Expose your balloon to heat first, a hair dryer will work perfectly for this, just point the blow dryer at the balloon for a few minutes, allowing it to heat up. Be careful with this, it may pop with the expansion. Quickly measure the balloon and mark down the measurement- it should have gotten larger.

Then, using the same balloon, pop it in the freezer for let's say 15 minutes. Take it out and quickly measure it again, it should be smaller. Then allow it to sit at room temperature for 30 minutes to an hour to make sure it's completely back to it's original temperature and measure again. Is it the same size as your first measurement? Discuss your findings with your child.

Friday, January 11, 2013

Bubbles?! BUBBLES!


bubbles
What kid seriously doesn't love bubbles? My kids love them that's for sure and it's such a fun and easy way to keep them occupied while mommy does mommy things! I love bubbles too. When I was a kid my Nanna would make bubbles for my cousins and me. We thought it was the most amazing thing. It wasn't until I got older and had kids of my own that I realized how easily bored we were and how hard it must have been to cope with hellions like us. Bubbles (and homemade ninja turtle masks) were Nanna's go to recipe for peace on earth! I now use the same things to distract my kids and get a little quiet time. Much like the pillow/blanket fort, however, bubbles have evolved again. You can get bubbles that are colored, bubbles that glow, regular bubbles, bubbles that are hard to pop and even bubbles with flavor. I just want to pause here and let you all know that I don't think I would ever even try flavored bubbles. I stopped trying flavored stuff that wasn't supposed to be flavored after the edible paper. That's gross by the way. Ok, back on track- as you know I try not to pay for anything that I can make at home so at one point last summer I looked up all of these recipes and now I'm going to share them with you!

Regular Bubbles
8 T dish soap
1 Quart water

Bouncing or Un-poppable Bubbles
1 cup water
2 tablespoons light karo syrup or 2 tablespoons glycerin
4 tablespoons dishwashing liquid Mix together and have fun!
The glycerin and kayro help to make a thick solution that works better than just soap and water.

Glow in the dark Bubbles
1 cup water
2 tablespoons light karo syrup or 2 tablespoons glycerin
4 tablespoons dishwashing liquid 1glow stick
snap or cut the glow stick and add the contents to the basic bubble solution. This will last only as long as the night stick holds it's glow.

Colored Bubbles
3 cups dish detergent
3 cups water
2 cups glycerin
several drops of food coloring or washable paint
just mix
As far the flavored bubbles go, I can't find a good recipe so I'm going to make one myself. Keep reading and after I figure it out you guys will be the first to know!
1. If bubbles pop easily or solution does not work well, add more water.
2. Dawn and Joy seem to be the best choices for bubbles. It is the antigrease agent.
3. Bubbles work best on an over cast day.
4. Bubbles love moisture so right after a rain also works well.
5. To catch a bubble just get your hand wet.
6. Glycerin or Kayro is added to the mix to make the bubbles more durable. The more you add, the stronger they'll be!
As far as bubble storage I saw a ridiculously cute idea on Pinterest. You just store your bubble solution in a drink container with spout for easy access! That would be great for storage while in use by the kiddos but for long term storage I would use empy plastic containers like milk jugs and juice containers.
Pinned Image


And have you seen the different ways to blow bubbles?! Jeez, the old school bubble wand has gone to the dogs!

The Bubble Pool:
Just fill a kiddy pool with bubble solution, have someone stand in the middle and have others lifta  hula hoop from the bottom over the person!


The Bubble Snake:
The way I understand this is that it's bubbles in a bottle with the end cut off and a sock secured to the end. Here is a link for the full project.


The Classic Bubble Wand:
Here is a link to a project where you can make your own. Here is a project where you can make super bubble wands for gigantic bubbles. Bubble wands and accessories come in all shapes, designs, colors and sizes. I've seen bubble pipes shaped like old tobacco pipes, tubes, something that I think was supposed to be a kazoo. If you can remember to do it, go to your local Walmart or dollar stores right about the time summer is going and fall is coming in and you'll find masses of bubble wands in all different shapes and sizes, even bubble guns, on sale for 50-75% off. Always shop for next season!

Tuesday, January 8, 2013

Edible Kid Science

I decided to do another post on science projects for kids, but this time I wanted to do something really fun. How about science projects and experiments that you can eat? Food is a great way for kids of all ages to learn. They love it. So, I did some research and came up with a couple of edible science project to do with my kiddos and decided to share them with you!
How to make rock candy:
  • 2 cups water
  • 4 cups granulated sugar
  • 1/2-1 tsp flavoring extract or oil (optional)
  • food coloring (optional)
  • glass jar
  • skewer or thread (see below)

  • wet your skewer or thread and roll it in granulated sugar, set it to the side
    bring water to a boil over medium heat in a medium sized sauce pan and start adding sugar one cup at a time, stirring to dissolve. Continue this till all the sugar is dissolved. When the syrup is smooth you remove it from the heat. If you're going to add food coloring or flavor now is the time to do it. Allow the mixture to cool for around ten minutes before carefully adding to a large mouth jar. Place your skewer in the center of the jar, held up using clothespins. Like so:

    rock candy

    The skewer must be as close to the center as possible and not on the bottom or this will not work. If you don't see a change within 24 hours boil again and add another cup of sugar. If you do see crystals starting to form then you're doing good. Allow the rock candy to grow until it's reached the size you want. Be aware that this could take up to a week.

    A great topic of conversation for the rock candy project is to discuss how stalactites and stalagmites are made in caves as it is a very similar process, just not as tasty!

    Invisible Ink:
    Write a message on a piece of  paper with lemon juice, using a paintbrush or stick. Allow paper to dry. Take your hidden message and hold it close to a light bulb to warm it up. The chemicals in the lemon juice will turn brown when heated, making your message appear. It's pretty awesome, we did this as kids a lot.

    A great topic of discussion for this project is to discuss with your child how different chemicals and different materials change color and composition (think melting) with heat.

    Make Butter:
    This is a great project and very tasty. You don't need much to make your own butter at all, it's a very simple project. I think that most people have not tried this because the idea of it is daunting. It's really not hard at all though!
    Here's what you'll need:
    heavy whipping cream (not ultra pasteurized)
    regular salt (not iodized)
    cinnamon and honey (optional)
    a way to mix it!

    If you shop near me, or are here from my facebook and know me, Walmart sells the type of cream you need. It's in a smaller container that's purple and gold sold near the other creams and the weird notmilks beside the milk. Get that.
    There are lots of ways to mix the cream into butter, a hand mixer works but a stand mixer is best as it could take a while.

    Now, if you don't feel comfortable letting your kid even think about using a mixer (and I don't) then all you need is a Tupperware container big enough to hold all the cream, by half. So if you pour all the cream in it, it would only be half full. Then, place a marble or two in the cream and put on an air tight lid. Hand over to your kid and have them start shaking.

    The process of making butter will look the same no matter how you do it. First, the cream will foam up and thicken becoming thicker and thicker. This thick fluffy mass would be whipped cream if you added sugar at this point. However, we're not making whipped cream this time, we're making butter.

    The fun starts now, the whipped cream will start to break down, becoming watery at this point. It will eventually start too look kind of like watery buttermilk. At the "buttermilk" stage it's time to stop the mixing. There will be little white chunks floating in the whitish water, that's your butter. Go ahead and either run some ice cold water in the sink or have a large bowl of ice cold water nearby. Scoop up as many as the little chunks as you can find, using your hands or a small hole strainer (like mesh). These little curds will stick together and, in your cold water massage the ball (it will feel like butter) over and over.

    Why you have to massage the butter, you'll notice, is to get all the water out. If need be empty the bowl and refill it with more cold water, continuing to do this until the water is clear or no more milky water comes out of the butter. If you leave it there it won't taste as good and will cause the butter to spoil quickly.

    That's it, you're done! You now have butter. Add your salt (just a pinch no more than a 1/4 tsp) and if you'd like add cinnamon and honey to taste. I promise you'll love it.

    What science topic I would cover in this is what materials turn to what with what process like how cream turns to butter, sugar to candy etc. I would even cover how dirt turns to mud. My kids love mud so we would have to discuss this and this project can really take the other two discussions to another level.

    Want a easy bread recipe to eat your butter on? Here ya go!

    7-Up Rolls:

    Ingredients:
    1. 2 c. Bisquick
    2. 1/2 c. sour cream
    3. 1/2 c. 7-Up
    4. 1/4 c. melted butter
    Directions:
    Preheat oven to 450. Mix the first three ingredients together, form balls and put onto baking sheet. Don't over mix. Brush the tops with melted butter and bake until browned.

    That's all I've got for this post, I don't want to keep making them super long, but I'll be sure to update when I come across more ideas for you guys, if you try them please come back and comment, let me know how they worked for you!
    Sunday, January 6, 2013

    Bath Time, Fun Time


    Bath time is a big deal at my house, the kids are definitely in love with water. When Tobers was still little I found some little tablets that changed the water different colors without staining our tub at walmart. I also bought them some bath crayons. Those didn't work out too well because of their age at the time. They spent more time eating the crayons than coloring on the wall. However, to make them even more comfortable with the move, I've decided to go back to that type of thing and I've begun looking up recipes for the same type of stuff I used back then. I'm thinking that the more fun they have the more comfortable they'll be and we actually have space to move around now. So here are some of the recipes I'm going to try if you'd like to try them with me!

    Homemade Bubble Bath:
    • 750ml/3 cups of liquid Castille soap
    • 15g/2 tbsp fine sugar ( confectioners or caster)
    • 20g/ 4 tbsp glycerin (vegetable)
    • optional: 1 level tsp of beet powder to make it pink, turmeric to make it yellow, or woad to make it purple
    • essential oils for sent (optional)
    • glass, ceramic or metal mixing bowl
    • large bottle
    • a funnel
    Stir together all the ingredients above (except the essential oils) and add the optional coloring if you want it to have a color. Once the sugar has completely dissolved,  place the bowl in a cool, dry place for approximately 24 to 30 hours. Once the mixture has been allowed to cure, add the essential oil fragrance combo of your choice. You'll only need a few drops. You may either add them now, or you can add the essential oils separately to each bath- it’s up to you.

    Jelly Bubble Bath -NOT EDIBLE:

    • Packet unflavored Gelatin
    • 3/4 Cup water
    • 1/2 Cup clear liquid soap or bubble bath
    • Fragrance oils (optional)
    • Food Coloring of your choice
    • Plastic jar with lid (you can use a cleaned out empty peanut butter jar)
    • Mixing Bowl

    Empty the packet of gelatin into a mixing bowl. Set aside.
    Warm water until it begins to boil. Immediately remove water from heat source. Carefully pour the hot water into mixing bowl and gently mix with gelatin powder. Allow gelatin to completely dissolve. Be patient! This may take a few minutes.
    Very SLOWLY and gently stir in the liquid soap to the gelatin mixture. Add a drop of food coloring and 5-8 drops of fragrance oil. (Be careful not to beat mixture, bath jelly will become foamy if you do.)
    Pour your bath jelly into a clean, clear container.
    Refrigerate Bubble Jelly until set (about 4 hours).
    To use, scoop a small amount of jelly into your hand and hold under warm running water for a bubbly bath-time treat!

    Body Glitter:

    Tobi loves this stuff. Just mix aloe vera gel and glitter, rub on with fingers.

    Bathtub Crayons:
    • Clear glycerin soap base cut into cubes
    • 3 or more soap color dyes (or food color dyes)
    • Essential oils in your favorite smells (optional)
    • Glass measuring cup for melting soap
    • Spoons for mixing colors and fragrances
    • Ice cube trays or round crayon molds
    Separate the soap base cubes; one pile for each soap color dye.
    Have the children place the soap cube for the first color in a glass measuring cup and melt in microwave in short bursts.
    Once melted, have the children add soap color a drop at a time, mixing well after each drop until you get the color right.
    Then, add a couple of drops of essential oils and mix well.
    Next, have the children carefully pour the color soap into ice cube trays.
    If you see any air bubbles on the surface of the soap, spray it with rubbing alcohol.
    Have the children repeat the same soap crayon making process with the rest of the colors.
    After that, allow the soap to set until it is firm. This could take anywhere from 30 minutes to a few hours.  When the soap is close to firm, feel free to place the soap in the freezer to speed up the hardening process.
    When ready, have the children pop the soap crayons out of the trays.

    Bathtub Paints:
    • 1/3 cup mild clear Joy dishwashing soap or baby shampoo
    • 1 tablespoon cornstarch
    • food coloring

    Mix cornstarch and liquid soap in bowl.
    Pour into ice cube tray, filling about 1/2 full.
    Put 4-8 drops of different food coloring colors into each section and mix till blended.
    I usually use toothpicks to mix when in the ice cube tray.
    Give to the kids and let them at it!
    This washes your child, and will wash off the walls too!


    I picked these recipes specifically because of the science behind them. I've found that the bubble bath recipes without glycerin don't really bubble up as well. They're usually just shampoo mixed with water. I was also particular about hunting down recipes that had no indication of staining as I just got that bathtub perfect, I don't know what I'd do if it was suddenly rainbow colored. Be sure to comment and let me know how you liked the recipes, I know my kids are going to love them.

    Bath time themed books (we sometimes read while in the tub, I'm big on reading ask my mom :)):

    1. Bath Time By Sandra Boynton


    Pinned Image

    Monday, December 31, 2012

    The Toddler Spy


    Years ago, when I was pretty young a movie came out called Harriet the Spy. This movie was awesome and inspired me to pretend to be a spy for a while after that. I can't wait for my kids to get interested in being little spies. Bubba already really thinks he is, sneaking around and trying to see what everyone else is doing! He's always got that mischievous little grin too. They do like movies like The Great Mouse Detective, anything where Daffy Duck plays a detective, Inspector Gadget, Scooby Doo and the Pink Panther. I think that making a spy kit for them will be really interesting. Even if they don't use it for spying it could also double as a bug kit for the up close and personal inspection of bugs. Bubba loves bugs.


    Here's what I would put in the spy kit:
    • a magnifying glass to "look for clues" (also good for looking at bugs)
    • a pair of plastic tweezers for picking up evidence (also good for picking up bugs)
    • a fake cell phone to call for help (I've got nothing for the bugs on this one! :))
    • flashlight for finding criminals and suspects in the dark (or for seeing bugs under stuff)
    • a cheap camera to take pictures of the criminals and crime scenes (also for taking pictures of bugs)
    • a notepad for writing down clues (or drawing the bugs they find)
    • a pair of gloves for inspecting the crime scene or not leaving finger prints (and for touching super nasty bugs)
    • binoculars to investigate from a distance (and search for bugs in trees and other high places)
    • a pair of costume glasses. You know the kind with the nose and mustache.
    That's really all I would include in mine for my kids till they get a little older. When Nick (my brother) and I were kids we had a device for listening in to conversations in the next room. I'd put that in one for older kids for sure. I would also switch out the fake cell phone for cheap walkie talkies. I would also add something like a yak bak or talkboy (remember those?!). Right now the kids will most likely only use this for looking at bugs but later on I could make them a great spy kit for next to nothing! I also found a pin that was a cute game they could play now while pretending to be spies. All you need is some red or green yarn and some paint safe tape like the blue painters tape.

                                                 Pinned Image

    Isn't that great? It's just like the lasers from the movies! It's also pretty good exercise for the kids. I can't seem to find the original poster for that, sorry. If you know who to give credit to, just let me know!

    Saturday, December 29, 2012

    Cheap and Easy Kid Science!

    Being "thrifty" means a lot to me. Neither Brandon or I are making lots of money. We do a little better than minimum wage but we're not making enough to afford many luxuries. If I could, I would go to my local Walmart and purchase every single one of those DIY craft kits and science kits for my kids. Unfortunately, even though they are *cheap* they're just not feasible. I could spend that money on more important things that we really truly need. So, when I have the time, I scour the web for cheaper ways to create a good learning experience with more than just construction paper and glue. Not that I'm knocking construction paper and glue. Those two things combined have given me a little mommy time on more than one occasion.

    Learning is a big deal in my house, and I love finding new ways to teach all three kids new things. At the toddler age I feel that science is the best. You can create a lot of interesting reactions that can keep their attention for hours. The important part of teaching these reactions to kids is discussing how it happened and why. In any case, if you have a toddler, they are going to want to know so try to have the correct answers waiting for them. Try to stray away from big words, and use smaller more understandable words to explain what the big words mean. I still believe in mentioning certain words like malleable and brittle for example- those are huge words to a child. I want my kids to have them in their vocabulary. They don't have to use them, just have a general understanding. I did.

    Dinosaur Eggs:

    These are so so much fun. Go to your local dollar store or Walmart and purchase a bag of tiny plastic dinosaurs. Then you're going to need:
    • 1 1/4 c. dirt
    • 1 1/4 c. flour
    • 3/4 c. salt
    • 1/2 c. sand
    • water
    Add water slowly to your dry ingredients until it forms a stiff dough like consistency. While it's still wet form balls of the mix around the little dinosaurs, completely covering them. These should resemble rocks. Then just set them in the sun to dry and harden. You now have fossils. Bury these in sand or loose dirt and give your child a shovel and a paint brush or even a plastic sieve. Allow them to dig through to find their fossils and then have them use the paint brush and something like a screwdriver or stick to dig the dinosaurs out of their fossils. Here is a great website to help you out in explaining fossilization to your kids.

    Plant Science:

    This lesson is very popular with children and very easy to do though it does take a while to work. You'll need several things:
    • cotton balls
    • dirt
    • rocks (like small gravel)
    • seeds (like lima beans)
    • styrofoam cups or plastic bottles (cut an empty 20 oz. in half, I feel that these are the best because they're clear and allow for a better view of roots)
    • paper towels
    • water
    ok so take your containers and line them up. You will put just dirt in one, just gravel in another, just cotton balls in another and just paper towels in the last one. Now, for your cotton balls and paper towels, wet these down before moving on, you'll want the container to be almost full when damp, leaving about an inch of space at the top. Then "plant" a lima bean in each container, about one inch deep. You'll have to shift your gravel to do this without hurting the seed. Remember that you're not putting dirt in all of these containers, just the one. Once every container has a seed planted place them in the sun and wait. After about a week (that's roughly how long it takes for a lima to sprout) check them every day with your child. Make note of which seed is growing the best. Your child may be very surprised that the seed doesn't need dirt to grow, talk about what plants need to survive and how each growing material is different.

    The Naked Egg:

    I remember doing this as a child, it was very very fascinating. This experience explains how acids work. All you will need is vinegar (our safe acid of choice), a container with a lid and some eggs. You could do this experiment with just one egg but I can't guarantee you that it will survive. Place your eggs in your container, making sure that they don't touch. Cover your eggs with vinegar and place the lid on your container. Bubbles will almost immediately form on the shell of the egg, this is the acid beginning to eat the shell and be sure to point out this reaction to your child. Then place the container in your fridge over night. After 24 hours pull the eggs out very carefully, rinse with water and cover again with vinegar. Note any changes in the shell with your child, and again note any bubbles. Place back in the fridge for another 24 hours. At this point the shell should be completely dissolved leaving only a rubbery membrane and the yolk- a naked egg.

    Germ Farm:

    warning: this experiment may just turn you into a germaphobe. It's gross. So, so gross. You are going to realize just how dirty every thing is.

    I did this project in high school science but I see absolutely no reason to not do this with your child. This lesson is all about germs and how even though you can't see them, it doesn't mean they're not there. With a little bit of food and the right conditions however, you will see them with this. You will need:
    • several cotton swabs
    • flavor-less gelatin (bought easily at any grocery store)
    • small containers with lids (dollar stores sell small tupperware like containers for really cheap)
    • masking tape
    • marker
    Now, make the gelatin according to the box directions and let it set. It's basically flavorless Jell-O. Now, take your cotton swabs and start swabbing different places. Only use one cotton swab for each place, do not reuse. You could swab:
    • different door handles in the house
    • the toilet
    • the bathroom sink
    • the gear shift in your car
    • the interior door handles of your car
    • the floor
    • a pets food bowl
    • a bed rail
    • keyboard
    • mouse
    • your own hands
    The list goes on, you can swab anything. Now, take one of the cotton swabs and rub it lightly across your gelatin. This transfers the germs from your swab to the container. Place the lid on loosely and use the masking tape like a label to let you know which area you swabbed is in the container. Don't skip this step you're, at the very least, going to want to know what you need to spray with disinfectant. Throw the swabs away. Place the containers somewhere dark and room temprature. Under the sink or in a cabinet would be perfect. After a few days take out each container and check it. Eventually you will see things starting to grow. The bacteria and micro-organisms will feed off of the gelatin and grow like crazy. There will be all kinds of different forms of fungi and mold and in all different colors. It's morbidly fascinating. 

    Volcano Explosion:

    This is a lot of fun and you probably already have most, if not all of what you need already in your home. Here is what you're going to need:
    • kool-aid
    • baking soda
    • vinegar
    • glitter
    • a small vase like a bud vase
    • a baking sheet
    Ok, so first take a small bowl or plastic bag and put in enough baking soda to fill the bulb of the vase 3/4 of the way full. Then add your kool-aid packet and glitter. Mix these really well and pour into your vase. Set the vase in the middle of your baking sheet and have your child pour in the vinegar, let's say a 1/2 c. and stand back. Mixing vinegar and baking soda in any application will cause a chemical reaction- making a lot of fizz and bubbles. The vase forms pressure causing the bubbles to rise to the top and pour over (this is what the baking sheet is for- easy clean up) and the glitter and kool-aid just make it pretty.


    That's all I'm going to do for this post as it has gone on long enough, enjoy the experiments and comment if you'd like to let me know what happens with your child!