Showing posts with label gardening. Show all posts
Showing posts with label gardening. Show all posts
Wednesday, January 30, 2013
Make the Most Out of Your Tomatoes!
I read a discussion at GardenWeb about tomato plants recently that was very intriguing. Apparently, a tomato plant can last for years. With a little pruning and care you can keep one indoors. Now, keep in mind that a lot of tomato plants are actually vines and will continue to grow and produce, so they would need a lot of space. I think there's a possibility that it would be more work than it's worth. You'd have to watch out for the chlorine in tap water. Also, tomatoes are full sun plants- they love the sun- and indoors they'll start thinning themselves out to survive so a UV bulb close by would also be a good idea. The soil would also have to be taken into consideration, because you'd have to add fertilizer pretty regularly. What do you guys think? Would having fresh home grown tomatoes year round be worth the work?
Monday, January 21, 2013
Gardening 101 Plants and Soil
| Want beautiful soil like that? compost! |
I love to grow things. I've never been sure if I have a green thumb or if I have only been good at it because of what my late father taught me. Dad came from a different style of living where gardening was a way of not only survival but life. It's just what they did. If I were to add it up I would say that my dad grew about five acres or more each year of different crops. We grew tomatoes of all kinds, silver queen, hickory king, peaches and cream, and several other types of corn. Along with that Dad grew sweet potatoes, red (new) potatoes, Kentucky runner green beans (they are very hardy), bell peppers, yellow squash, cucumbers, watermelon, cantaloupe, honeydew, and the list goes on but those were the regulars. Oh, and the strawberries. The strawberries were great. There's just something unappealing and tasteless about the grocery store strawberries. It's just too far from being the same thing.
If you're wanting to start your own garden my biggest piece of advice would be to study up on the specific plants you want to grow. For example, early girl tomatoes and Roma tomatoes are not the same kind and are often used for different purposes. We grew both and I've found that people just really preferred to can with romas. Early girls are amazing on sandwiches. The type of cages you would use are completely different as well. We grew a certain kind of tomato for a long time. I'm not sure of the exact breeds but we called them all German tomatoes. They were heirloom, of that much I'm sure. Most were a dark blush pink, some were purple, and some were yellow with pink stripes coming out. I believe these were called Mr. Stripey. These tomatoes are awesome. They're big, the flavor can't be beat and they produce more meat than flesh, being good for just about anything except maybe juicing. These German tomatoes however, were completely different from romas or early girls. They. Were. Huge. You know those little wire tee pee style tomato cages you can get at any hardware store? Yeah, forget those. These tomatoes will outgrow those wimpy little cages fast and snap them into pieces or bend them over completely. We tried every thing, but they were just too heavy. One day dad got fed up with them and went to the local hardware store and bought some square fencing. We spent all day rolling and cutting the fence into souped up tomato cages. We never had to buy another again. However if you have limited room this is not the solution for you, these cages are large and need a lot of storage space.
I suppose if you were wanting to start your own garden I could give you a few basic ideas. The first thing you would need are tools and good soil. The seeds or plants are no good if the soil is no good. You can order a soil test kit online or you could do it the old fashioned way. Dig up some dirt and put it in a mason jar (a little less than half full), fill with water and shake it up. Shake it really well. Then walk away and let it settle for a while. You want your dirt to be in three pretty close to even layers when it settles. The three different layers are sand, clay, and the topsoil which is a lot like compost. You can test to see if your soil is acidic or alkaline using this method:
- Scoop some soil into a container. Then, add a half-cup of vinegar. If the soil bubbles or fizzes, it's alkaline.
- If there's no reaction, scoop a fresh soil sample into a second container. Add a half-cup of water and mix. Then, add a half-cup of baking soda. If the soil bubbles or fizzes the soil is highly acidic.
- Amend your soil with wood ash or lime, if it's acidic. Amend your soil with sulfur or pine needles, if it's alkaline.
Other Useful Links:
 Fine Gardening- A post about using wood ash to improve the quality of your soil.
 Traditional Fools- steps on building your soil to improve gardening success.
 Scout's Stitches- stretching garden soil.
 Plant Care Today- How to improve garden soil.
Garden Tools
Garden Tools
Having your own vegetable garden can save you a lot of money. The veggies are of higher quality, better taste and you know how they were grown. Not to mention if you're a "prepper" like me, you'll have plenty of produce to can and stock up for food stockpiling. If you're planning on starting your own garden you're going to need tools to prepare your soil. I've already went over testing your soil, and compost. Now we're going to talk about tools. Tools are very important to gardening and what you tools you'll need depend on what type of garden you're going to have.
For flat bed gardens (just a turned over piece of soil) I highly reccomend investing in a small tiller. However, you're going to want to keep costs as low as possible. After the initial investment with the first garden you'll probably break even financially. However, you will have the satisfaction of knowing exactly what was used in growing your food and the taste can't be beat. I'm personally spoiled on home grown and I feel that the majority of fresh fruits and veggies you get at the grocery store have little to no flavor compared to home grown. If you only buy organic and you grow your garden organically you will, most likely, save money.
Choosing what tools you'll need will be, in my opinion, your biggest expense. You can knock down that cost by putting more work into what you're doing. On the other side of that coin you can make things a little easier by purchasing better tools. It's the difference, price wise, in a tiller and a cultivator.
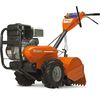
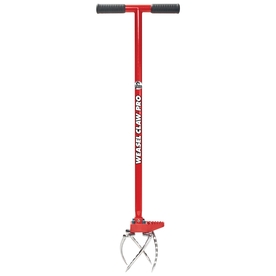
3. The tiller. Ok, so this could go in so many directions. This beauty is the Garden Weasel brand sold at Lowes. I've never tried this one before. I can't say which one I tried because I had to modify it and I don't want to give any negative reviews. Let's just say that if you purchase one that has a pin holding the head onto the handle- replace that pin with a small bolt and nut- it will break. This tiller is hand held and will cost you around 25$ but you can buy the much more expensive motorized tiller at varied prices. The handheld version will do the job though. If you have one you may not want to purchase the mattock at all, though I still would to make it easier on whichever tiller you purchase. A tiller basically chews up soil, turning it fine and nice, and wonderful. However, if you don't prepare the soil by at least breaking it up before hand and just stick the tiller down into compact soil it's tiller abuse. It's hard on it and not a good way to treat your investment.
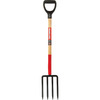 4. The hay fork, or compost fork. You will need this tool to turn your compost- helping it decompose faster.
Any other tools you would need are simple at this point, a small trowel (hand shovel) for transplanting, a water bucket for watering and maybe a water hose. There's also of course a hat for protection from the sun, and gloves. With these tools and a little hard work you should have no problem getting your garden ready for planting. If you need any thing else you'll learn as you go. There are no set rules to gardening tools, it all depends on the gardener, the plants, and the soil. For instance if your soil is rocky you'll need a rake, if it's not, you won't ever use it much. I really can't stress enough how much this is tailored to you, what you're growing and what you are capable of.
So get out there and grow your own vegetables, you'll love the feeling of accomplishment you get, the money you save and the very best part the taste!
So get out there and grow your own vegetables, you'll love the feeling of accomplishment you get, the money you save and the very best part the taste!
Sunday, December 23, 2012
Already Ready for Spring
I don't know about you guys but I am so ready for winter to be gone. I'm still excited about Christmas but this cold weather can just go away. For some reason today I've been thinking a lot about warmer weather and gardening. I have yet to decide whether or not I want to move in with Brandon but there is definitely some appeal in the large yard and space for a garden. I inherited a great love for homegrown fruits and veggies and the money I save doing it is also astounding. I'm really big into composting too. It's amazing for the plants and healthy for the soil as well. Plants can leach the soil of it's nutrients making it harder to grow the same thing in the same spot year after year without some kind of assistance. Fertilizers are also good for this but compost is essentially free.
If you're interested in composting the first thing you will need is a place to compost. Some people make bins out of rain barrels, some people use plastic tubs and some people make large bins out of wooden shipping pallets. Compost also needs to be moved around (turned) to agitate it, allowing oxygen in and in warmer months it needs to be sprayed down with water every once in a while. Both turning the compost and wetting it speed up the process of decay which is what you're looking for. So keep in mind that you're going to need to do these things when deciding where you want to compost and when. Don't worry though, contrary to popular belief; compost does not stink. There are rules to what you can compost and what you can't- following this will you keep you stink free.
Here are a list of just some of the things that can be composted:
To really stretch out your compost when it's finished mix it in with potting soil or garden soil and pour into planting beds. If you use raised garden beds it's a good idea to lay down a layer of newspaper and then straw or leaves before adding your compost/soil mixture to get really good drainage.
So, there are some tips if you're interested. It's never a bad time to start composting and gardening. It helps save money for gardeners and helps the environment.
If you're interested in composting the first thing you will need is a place to compost. Some people make bins out of rain barrels, some people use plastic tubs and some people make large bins out of wooden shipping pallets. Compost also needs to be moved around (turned) to agitate it, allowing oxygen in and in warmer months it needs to be sprayed down with water every once in a while. Both turning the compost and wetting it speed up the process of decay which is what you're looking for. So keep in mind that you're going to need to do these things when deciding where you want to compost and when. Don't worry though, contrary to popular belief; compost does not stink. There are rules to what you can compost and what you can't- following this will you keep you stink free.
Here are a list of just some of the things that can be composted:
- paper (paper towels, newspaper, toilet paper etc.) shred paper or lay it out in layers
- cardboard (old boxes, tubes, pizza boxes etc.) for larger boxes tear them up for a faster process
- peelings and rinds (the peeling/skin off of anything is great for compost)
- egg shells
- coffee grounds (don't forget the filters)
- hair (like off your hairbrush or from pet)
- vacuum dirt (empty the canister in the pile!)
- tea bags
- grass clippings
- leaves
- stale bread crackers, beer, pretzels and cereal
- plain pasta
- cheese
- old pieces of cloth cut into small pieces
- ashes
- Animal manure from herbivores and poultry
- ^their bedding
- saw dust and wood shavings
- hay and straw
- Flour (mix this and breads/cheeses well to avoid attracting rodents)
To really stretch out your compost when it's finished mix it in with potting soil or garden soil and pour into planting beds. If you use raised garden beds it's a good idea to lay down a layer of newspaper and then straw or leaves before adding your compost/soil mixture to get really good drainage.
So, there are some tips if you're interested. It's never a bad time to start composting and gardening. It helps save money for gardeners and helps the environment.
Subscribe to:
Posts (Atom)