Showing posts with label cleaning. Show all posts

Saturday, January 12, 2013

Organization for Kids


OK, so the organization posts I did before seemed to get more views than any other posts. So, I'm going to do another one. This one will be organization for kids. Keeping kids organized makes things easier on everyone involved. I've compiled just a few ideas here, these are solutions to problem areas that we have. So I'm assuming I'm not the only one!

Magnetic cups are genius. I had never considered this before but it's so easy and so cheap. All you need are small magnets you can find at any craft store and some cheap plastic cups that are just right for your child. Attach the magnets to one side of each cup and tell your child that when the cup is empty to take it to the fridge and stick it to it. Remember though, magnets do not stick to real stainless steel. This way there's no lost cups and you can easily grab them to give them a quick rinse or wash for more later.

Bath tub toy organization? I usually get the giggles when this topic comes up as it really is an annoying thing to take care of. Stores sell several solutions for this and most of them have small suction cups to stick to your bath tub wall. These products have never worked for me because they've never been strong enough to hold all the kids toys. I have found two different solutions to this problem. You can use a hanging fruit basket to store the toys, just hang it from your curtain rod. Or, if you don't have a curtain rod (like in the case of glass shower doors) then you can go buy a curtain rod. Seriously, go get one! They're really cheap and can be found at almost any store. Just hang a few baskets from this rod, stretched across the back wall of your tub and voila!

Kobalt 61-Pocket Bucket Tool Organizer
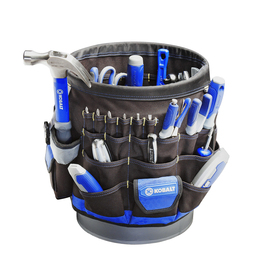
Art supplies are scattered all over my house, in different drawers and folders and on different surfaces. The kids and I do a lot of arts and crafts. Just recently I saw an idea where you can purchase a product called a bucket boss. This product basically fits perfectly in a five gallon bucket and is normally used for tools. However, I think it would really be perfect for art supplies. This type of product goes usually for somewhere between 15-25 dollars. I found the one in the picture here at Lowe's  for 14.98. I love Lowe's I really do. Basically you can fit all of your smaller things like pencils, markers, scissors, glues, etc in all the little pockets and your larger things like papers, books, long rulers, etc in the middle.


What about displaying your little one's art? I really like this idea. Basically you just get several small strips of wood (Lowe's) and some basic office clips from any office supply store. Attach the clips with either hot glue or screws to the board and attach the board to the wall. You could also put a cute quote above this like "Masterpieces" "Future Artists" or just "Artwork" in a cute font. The boards could also be painted and stained in so many options!

Another idea that I'm just in love with is using metal rain gutters (10 ft. for 7.49) to organize children's books! Gutters can be bought cheaply at Lowe's and attached to the wall studs horizontally, open side up and books placed inside. You can use gutter hangers to hold them if you'd like. Paint the gutters however you'd like, or just leave them plain. Use a level to make sure each gutter is level and don't forget end caps. The ends of gutters can sometimes be sharp so always cap the ends to protect little fingers!

That's all I've got for now guys, I hope you've enjoyed it. I'm sure I'll come up withsme o more. I can't do it all in one post you know!

Saturday, January 5, 2013

Homemade Oxi Clean and Fabric Softener


The other day I posted my own recipe for the homemade laundry detergent. It's working great, by the way. That same night I got into a huge DIY phase where I had to make all kinds of stuff all at once. I made homemade fabric softener and homemade oxi clean. Both are working wonders. I based both the laundry detergent and fabric softener on other recipes I had seen. Most of the recipes vary from site to site, so I made my own based on the different reviews. The oxi clean I came up with all by myself. They've all worked so well.

Fabric Softener:
6 parts water
3 parts vinegar (I used rice)
2 parts conditioner (I used some VO5 I had on hand)

Mix (not shake) together and use a funnel to pour into a plastic/glass container. I used another left over laundry detergent bottle for this. Use a half a cup per load.


"Oxi-Clean":
2 c. washing powders
2 c. borax
1 1/2 TBS Dawn dishwashing liquid
2 tsp febreeze

I used a fork to mix with, whatever you use be sure to mix in every thing well. The dawn and febreeze will mix in very well. I use 1 TBS per load.

All Purpose Cleaner:
2 c. washing powders
2 c. borax
water

For this I just used a medium sauce pan and just filled it up with water. On medium heat stir until the borax and washing powders dissolve. Pour into container.

Bathroom Cleaner:
2 TBS Lysol Toilet bowl cleaner for hard water and rust/lime
water
empty spray bottle

Ok, so I totally cheated on this one. All I did was dillute this amazing toilet bowl cleaner. It's awesome. You guys have no idea, it works really well for the tub and kitchen sink. I also poured some of this stuff about an inch deep in a plastic cup and put our shower head in it. Then I poured some more (not much) in the inside of the shower head. Five minutes later, it was clean and had a beautiful stream- like brand new. I love this stuff. Try it. Go. Now.


That's all I've got for now. Please be aware that these cleaners I've made are not "sudsy" cleaners. When they start to work you're not going to see a whole bunch of soapy looking bubbles like you might be used to. That's ok. I'm not only making this to save money but to keep plastic out of the landfills. If you can, please reuse containers. Alot of containers only need to be washed out before they can be reused. WARNING: NEVER MIX BLEACH WITH AMMONIA IN ANY AMOUNT IT CREATES DEADLY FUMES
I save a lot of containers and reuse them, it's recycling. Repurpose things guys, it's not hard at all and it helps our enviroment, saves you money, and provides convenience. There's a lot  you can do with the empty laundry containers. A lot of things need to be put in air tight containers and sealed well, these are air tight and seal well. They would also be good for storing the benneficial "tea" from your compost, storing any thing, like let's say Miracle Grow, that comes in a box. There are a lot of art projects you can do with these at all. My two favorite would be making animal "heads" out of them for hanging on a kids wall and making little fairy houses out of them by cutting out a door and windows and then covering with rocks, marbles and moss. Here's a list of more stuff you can do with these bottles.
  1. Handy scoops can be cut out of them, like small trowels
  2. If you're diabetic this is a safe way to dispose of your used needles
  3. Ice salt shaker (store your ice salt for your driveways in these to conveniently shake it out.
  4. fill them with sand or water to make weights for weight training.
  5. storing small things like nails, screws, buttons, etc.
  6. sturdy templates for crafting.
  7. store old rags
  8. to store grocery bags for reuse
  9. hand washing station in the garden
  10. storage of any liquids
Always make sure you thoroughly wash these bottles out


Helpful Links:
15 Uses for Laundry Detergent Bottles
10 Uses for Laundry Detergent BottlesReusing Laundry Detergent Bottles
How to Re-use Laundry Detergent Bottles in the Garage
10 ways to Repurpose Laundry Detergent Bottles

Friday, January 4, 2013

Homemade laundry detergent

Tonight we ran out of laundry detergent and had to go get more. There's always laundry to be done in this house. However, there's always a need for money in this house too. So I decided to get the ingredients to make laundry detergent. It's definitely worth a try. Here's what I picked up. Just so you know, before you ask I picked up all of these things at Walmart in the laundry detergent aisle. Be aware though, I didn't get a picture of my washing powders but what is in the picture here is baking soda. You don't want baking soda you want washing powders. It's not the same thing. They're all next to each other.


Ingredients:
  1. a box of Arm and Hammer washing powders
  2. a bar of Fels-Naptha soap
  3. a box of 20 mule team borax


Directions/Recipe:
  1. grate up half of your bar of soap into a medium sized sauce pan
  2. add six cups of water and, on medium heat stir until melted.
  3. add two cups of washing powders
  4. add two cups of borax
  5. stir until dissolved
  6. In a large enough bucket (2 gallons or more) place 4 cups of hot water and stir in your soap mixture
  7. add another gallon plus six cups of hot water and stir
  8. allow to cool, will gel over night
  9. add to your empty containers
 NOTE: I added the mix into my containers while still warm. When mix starts to gel it will have little beads of solid in it. This will not be as thick of a gel as what you buy, it'll still be a little soupy and will need to be shaken before each use. I use about a 1/2 a cup per load.

WARNING: Brandon has some pretty nasty work pants, that are really really soiled every night he works. Anything that's exceedingly gross should be washed by itself or in a small load, and if you'd like use some of my laundry booster (homemade oxi-clean, recipe to come later)


Fabric softener recipe to come later, along with kitchen and bath cleaner and an all purpose cleaner


This picture really shows what the mixture looks like after it's melted and all the powders are dissolved.


I have found that my laundry detergent recipe works pretty darn well if I do say so myself, but here are some links to other recipes where other people have made their own, you'll see that they don't vary very much! Some will be dry and one is unscented!
Homemade Laundry Detergent @ Simply Designing
Homemade Laundry Detergent @ Great Oak Circle
Hypoallergenic Laundry Detergent @ Ehow
Homemade Laundry Detergent @ Happy Hooligans
Homemade Dry and Liquid Laundry Detergent @ Life at Cobble Hill Farm
Stain Removal 101 discussion about scent free laundry detergent


Storage Inspiration!

Homemade Laundry Detergent. Homemade Laundry DetergentHomemade Laundry DetergentHomemade laundry detergent - happy hooligansHomemade Laundry Detergent - Liquid and Powder Versions


Saturday, December 15, 2012

More Organization? YES!

I love easy organizational tips, anything that makes my life easier. When I was waitressing (and I did a lot of waitressing) I learned that every little thing that you can do to make life easier was really worth it. My goal was to minimize the steps I had to take (bringing pitchers to a table of the same drink, getting everyone at the table what they needed at once, etc.) and I like to try to incorporate that into my every day life. Here are a couple more ideas for you guys that I have either utilized or I am going to utilize. I wouldn't post it here if it didn't work.

1. Cheap silverware organizers for jewelry! This is a genius idea that I found on Pinterest. It's not something I can use as I can wear all the jewelry I own at once. My girls, however, are very frilly girly girls. No idea where that comes from by the way, I'm beginning to think it's a gene that skipped me. So you get the cheap organizers, add some picture hangers to the back so that you can hang them on the wall. These are also found cheaply at Walmart. If you're looking to paint these I would do so before adding the hangers. Also purchase some hook screws. They kind of look like the hooks you screw into your ceiling for hanging planters but much smaller. Screw them into the insides at the top of each little space, or against the bottom, if you'd like. Use as many or as little as you'd like- these are for hanging necklaces and bracelets. Rings can be placed on the horizontal spaces, like shelves. You could also attach wooden pegs or cabinet door knobs for this. I would add hooks to the bottom for extra storage as well.


and the link: Tatertots & Jello

2. Turn old boxes like shoe boxes, diaper boxes, shipping boxes, etc. into storage. Left over wrapping paper, duct tape, paint and fabric scraps are all ways to decorate an old box. My personal favorite is sisal twine. You hot glue your end of twine and the top or bottom of the box and start wrapping it in the twine. It's cheap (13.38 for 2250 feet at Lowes) and very pretty, resembling a basket. Sisal is also going to make your box last longer, as will duct tape- which you can buy in just about any pattern these days. Just hot glue the end once you've covered your box. You can finish off the top however you'd like. Braid some of the twine and hot glue it on, or you can hot glue on buttons, bows, shells, anything.You can also add fabric to the top. For the smaller boxes add toilet paper rolls or paper towel rolls to store your chargers and cables or pens and markers. The possibilities are endless and very close to free! You may also want to hot glue a clothespin to each basket, for holding a contents card. That way if you have several of these at the top of- let's say a linen closet- then you know which one holds what.

Pinned Image
Mandy's Krafty Exploits

Pinned Image

3. If you're like me, or any other female in my family, then you happen to own a lot of spices. They're probably not very well organized either. For example, while at my mother's house one day baking I found five jars of ground cinnamon in her spice cabinet. Five jars. Five! Why? Because she wasn't sure she had any and had bought more (she cooks a lot). Apparently this has happened quite a bit. My solution? Garage organizer clips. The kind meant to hold brooms and shovels and such. They're also used in the kitchen to hold brooms and mops. They can be found at any Ace, Lowes or Home Depot. If you really want to be crafty you can make your own by cutting little 1.5" slices out of PVC pipe and then cutting a small section out of each of these. It should look something like an almost closed letter "C". Screw them into a piece of board at the back of the "C". The pipe will flex and grip each spice jar. You may even buy some strip insulation with the adhesive backs to add on the inside of the "C" for better grip of glass jars. Then screw (or however you want to do it) into the inside of your cabinet door. It's extra important- no matter which way you choose to go to add a label directly beneath each clip. That way when you're making your grocery list just open the door and BAM! You know which spice you used up for Tuesday's potluck.

Pinned Image
www.organizeyourstuffnow.com

Another, more simple, way of organizing your spices is to move them from a cabinet to a drawer. Purchase some small mason jars (make sure the drawer will open and close easily with the jar's height) and use chalkboard paint to paint the tops. Use chalk or, for a permanent solution, a white out pen to write the type of spice in the jar. You may not be able to see which one's empty immediately but you'll know what you have and don't have without having to move around a bunch of other jars. If you don't have spices and would like to, check out your local dollar store, they sell them cheap or grow your own.

Pinned Image
Frugal Decor Mom
4. Cereal containers. I don't eat cereal- never have. I just don't really like it. But those plastic tub containers for them at the grocery store? I love those. They have to have the easy-pour spout though. I put anything in them. Sugar, flour, macaroni, farfalle, Bisquick, oats... the possibilities are endless. Spend the money on these guys, don't go cheap. If you can find one with an air tight seal go for it. There is absolutely nothing worse than finding your beautiful and expensive bread flour full of weevils. Notice how they have 'evil' in their name. Just sayin'. Be sure to clearly label these guys. Again with the chalk paint :D If the container needs to be washed you can and then just re-write what you're going to keep in that particular container.

Flour_dispenser
Rare Bird Finds  -still cheaper at Walmart- just sayin'

5. Pencil trays. They served no purpose for me, normally. However, recently I came across some inspiration. Almost every pantry or cabinet I've seen has toom to put these in on the inside, just screw them to the wall or cabinet and use them to store easy to get to snacks or your smaller pantry items. Examples being apple sauce pouches (my kids love these), foil pouch tuna or salmon, those instant oatmeal or cocoa packets that almost always seem to be floating around my shelves, soup mixes, powdered dressing mixes, the McCormick seasoning pouches, etc. There's no telling how many of these I've thought I lost. These are also the perfect size for spices.

Pinned Image
Domestic Imperfection


Always feel free to check out my Cleaning and Organization board on Pinterest for lots of other great ideas. Cleaning and Organization Board

Monday, December 10, 2012

Organization... no one really wants to do this.

Pinned Image


I was on Pinterest today (I'm an addict) and found a couple of organizational ideas that I honestly feel really stupid for not thinking of before. I thought I'd share them with you guys. These are things that are actually easily and cheaply done and free up space, or time, which we all need! I know no one actually wants to do this with all the other more relaxing things you could do but these are simple tips to start organizing your home one step at a time.

1. The dollar store wire dish drainer can be bought pretty cheaply and work amazingly for storing all of those plastic lids. It's already made to hold things like that upright and is easily picked up and out of the cabinet to rummage through. I have the good intentions of buying the nice storage system with the easily found lids but I never remember it when I'm at the store with the money. I only remember it when mine come sliding out of the cabinet, attempting to assassinate me. Go ahead and throw out all the ones that don't have a bowl to them anymore. I had fifteen. Really? Fifteen lids that went to absolutely nothing.

2. The cheapo shoe organizer. You know what I'm talking about, the clear plastic thing meant to hang on your closet door to store all your shoes that you never use. Yeah, that thing. Cut it down, and attach it to the cabinet door under your sinks to hold extra shampoos, brushes, lotions, cleaners, etc etc etc. I was thinking the main problem with this one is the way you attach it because we've all had that one shampoo bottle leak and it's not easily cleaned up. Any ideas on that?
3. The DIY hat organizer. My Brandon has a lot and I mean A LOT of baseball caps. Does he wear them? No. He only has two that he wears, a UK hat and his work hat. Can I throw the others away? No. Why? Because he might wear them one day...So all you do is get a wooden hanger and some round shower curtain hangers (the part that attaches the curtain to the rod) put the little hangers on the bottom of the clothes hanger and clip the hats onto those-facing the same direction. I have 20 on mine. All stored away in the back of the closet just "in case".

4. User Manual/ Warranty Organization. If you're like me you have a drawer dedicated to this crap. I can never find the one I need when I need it. All you need is a large three ring binder (I buy these at thrift stores quite a bit) and some clear three ring pockets (they only have an opening in the top and three holes on a tab to connect to the binder. Dedicate one pocket to each product and in this pocket keep your receipt, user manual, and any warranty information or insurance information. Just as a little add on I also recommend keeping a note (maybe on the outside of the pocket in sharpie) of the brand name model number and serial number. Also keep note of any expiration dates on any of these warranties as with several companies you may be able to call in and renew the warranty as long as you call in before the expiration date. Trust me, I work for one of these companies and I can't count the number of customers who had a serious and costly problem two days after their warranty expired.

5. The tension rod. Last one for this post. You can get small tension rods pretty cheaply at the dollar store and walmart. I know you know what I'm talking about even if you don't realize it. These are the spring loaded round rods you put in your window frame to hang curtains. In this application however you put them in your cabinets, running vertically (or horizontally if you'd like though you'd need more this way) to store baking pans and cookie sheets separately so that you don't have to unstack a huge pile to get what you want.

This post is really longer than I wanted it to be. I guess Brandon's right, I do talk too much!! Please feel free to leave any comments of any ideas you have. I'm particularly fond of re purposing something, using it in a way you never would have thought of and thanks for reading!