I haven't been feeling well lately. I think I've had the flu. I probably still have it but I'm feeling better a little bit at a time. It sucks, but I'll live. I haven't been posting any thing new, all my recent posts have been drafts that I had saved back for an occasion just like getting sick. I hate being sick- but it doesn't happen often.
I've been trying to rehabilitate our bathroom... but it doesn't seem to be working too well. I can't knock down any walls or afford to change the tub sink or toilet (which are blue by the way) so there's not a lot I really can do. All I know is that my saving efforts are failing and I feel like it's time to just put the whole thing out of it's misery. Not to mention I've seen closets bigger than this bathroom! Seriously, we have a black rug for the toilet and a squarish one for the floor, they don't both fit without overlapping. I painted the ugly plastic and MDF vanity (just imagine that...) black. I obviously can't sand and stain and I don't like brown paint. I don 't like anything that pretends to be wood ha ha. I also managed to take out the shower door rails. The previous renters had taken out the shower doors but the rails they had been on were still there... the doors had frosted swans on them so I'm so glad they're gone). Let me just say that if you have shower doors you should take them out. I'll be sure to post pictures later when I'm closer to finishing this business. The side bars came out easily, with no damage or anything, the bottom bar that the door sat on was a little harder but when I got it up I was shocked. It was revolting how much nasty stuff was under these shower doors. It's not like I don't clean them- they looked fine from the outside- and they seemed well caulked. Somehow though, water had gotten trapped beneath them (the caulk was helping hold it in too!?) and had all kinds of nastiness. Yes, I'll be posting pictures of that too! I'll never have shower doors again.
I'm also excited about spring coming up. I can't wait to get my garden beds made. Since this is a new place I'm not sure what I'm going to make them out of either. Normally when I plant things I either use planters or just straight in the ground. I've never done raised beds but I'm really considering one this year for the veggies so I can incorporate my beautiful compost easily.
I'm determined that this year is going to be a good year. I've been thinking about making a lot of changes in my life recently. There's going to be another post on that later. It's not just a New Years resolution kind of thing or a birthday kind of thing (was the 14th). I just am so tired of how my life has been going. There are a lot of things that really need to change for me to get what I want done. I'm just sick of it. I'm not angry, I'm just tired. I guess that's the only way to put it. I'll have to do some more thinking first on what I want to change. I don't like saying I'm going to do something and not do it. So, when I've decided what needs to change I'll let everyone else know. Also, keep checking back for a big secret announcement soon. OH! Also, Monday (tomorrow) I'll finally find out whether or not I got the management type position for the company I work for! I'm so excited. I hope I get it but you never know, a lot of people applied.
Sunday, January 20, 2013
Saturday, January 19, 2013
More Fun Kid Science
I really do love doing science projects with my kids, we keep it simple so that they can fully understand the process. They're always amazed with the things we do. I don't just do science projects with the kids either, though they are my favorite because to them, it's like magic. Really from a psychological point of view, Bubba tends to enjoy the science projects and chemical reactions a bit more than the girls do. To me, that's evidence in itself as to why boys do tend to do better than girls in Science class. It's just more understandable to them I suppose. Maybe it's just that they're more into blowing stuff up and making messes. Snakes and snails and puppy dog tails and all that. Several of my friends have really liked the other kid science projects I've posted and linked to so I thought I would do another one, here it is.
Bouncy Balls:
Acid Based Reaction to Blow Up a Balloon:

Density Project:
Hot/Cold Balloon:
For this project you're learning how the air around us will expand and contract when exposed to hot and cold conditions. You could even use the balloons you blow up from the project above. Your tires do the same thing by the way, that's why it's important to know how to air up your tires.
First you'll need to measure your balloon at room temperature. A fabric measuring tape works best for this, which you can find in your sewing/fabric aisles- that's what they're normally used for. Mark down your measurements throughout the project.
Expose your balloon to heat first, a hair dryer will work perfectly for this, just point the blow dryer at the balloon for a few minutes, allowing it to heat up. Be careful with this, it may pop with the expansion. Quickly measure the balloon and mark down the measurement- it should have gotten larger.
Then, using the same balloon, pop it in the freezer for let's say 15 minutes. Take it out and quickly measure it again, it should be smaller. Then allow it to sit at room temperature for 30 minutes to an hour to make sure it's completely back to it's original temperature and measure again. Is it the same size as your first measurement? Discuss your findings with your child.
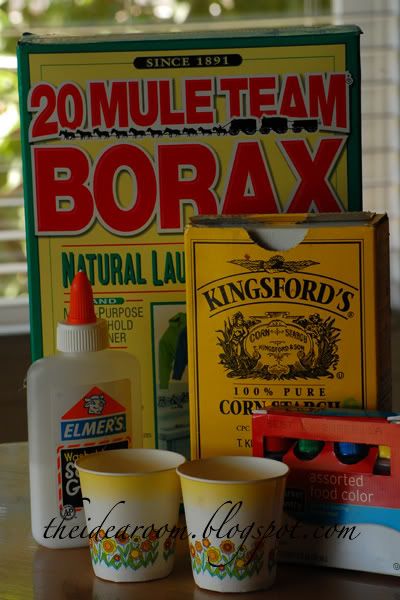
Bouncy Balls:
- 1/2 tsp Borax (found in laundry section) You may have some left over if you made the laundry detergent.
- 2 TBS warm water
- 1 TBS corn starch
- 1TBS glue (clear glue makes a see transparent ball and white glue makes an opaque ball)
- 2 small mixing bowls or cups
- a stirring stick (plastic spoon)
- food coloring (optional)
Acid Based Reaction to Blow Up a Balloon:
- baking soda
- vinegar
- small funnels
- empty bottle like a soda or water bottle

Density Project:
- 1/4 c. dish washing liquid
- 1/4 c. vegetable oil
- 1/4 c. vinegar
- 1/4 c. karo syrup
- 1/4 c. honey
- 1/4 c. rubbing alcohol
Hot/Cold Balloon:
For this project you're learning how the air around us will expand and contract when exposed to hot and cold conditions. You could even use the balloons you blow up from the project above. Your tires do the same thing by the way, that's why it's important to know how to air up your tires.
First you'll need to measure your balloon at room temperature. A fabric measuring tape works best for this, which you can find in your sewing/fabric aisles- that's what they're normally used for. Mark down your measurements throughout the project.
Expose your balloon to heat first, a hair dryer will work perfectly for this, just point the blow dryer at the balloon for a few minutes, allowing it to heat up. Be careful with this, it may pop with the expansion. Quickly measure the balloon and mark down the measurement- it should have gotten larger.
Then, using the same balloon, pop it in the freezer for let's say 15 minutes. Take it out and quickly measure it again, it should be smaller. Then allow it to sit at room temperature for 30 minutes to an hour to make sure it's completely back to it's original temperature and measure again. Is it the same size as your first measurement? Discuss your findings with your child.
New Kitchen Storage
We have one of those kitchens that has a lot cabinets...or appears to, but there's no real storage. This irritates me, I feel like storage is the most important part of a kitchen. Not to mention the big empty wall on one side... it just feels like it's staring at me. I have to do something with it, and because we've turned the formal dining room into a "hang out" area for the adults I don't have anywhere to put a table- if I had one.
I also feel like there's a real importance to eating as a family, together. I did and every reasonably sane person that I know did. There are studies showing that children who share meals with their family tend to also do better in school and life in general. So obviously, there is something behind the idea of eating together- even if it is "old fashioned". It's also a great way to build communication in the family because everyone is together at once.
This is what I started out with, it's a workbench style table that has served us well for many purposes but has been sitting in the garage collecting dust for quite some time. As you can see, it's not in the best of shape though it is very sturdy.

The first thing I did was use a plastic paint scraper and quickly scraped all of the dirt and loose paint off of the top. That took quite some time but was definitely worth it. Then, I found some black satin paint and repainted the top. Right as I was getting close to the opposite end with the paint I felt like it needed an extra something and remembered the chalkboard spray paint I had in the closet, so I broke it out and finished the last one and a half feet with the chalkboard paint.


So what do you guys think? It only took about two hours to complete, and it's almost doubled the storage we have. I'm so in love with it!
I also feel like there's a real importance to eating as a family, together. I did and every reasonably sane person that I know did. There are studies showing that children who share meals with their family tend to also do better in school and life in general. So obviously, there is something behind the idea of eating together- even if it is "old fashioned". It's also a great way to build communication in the family because everyone is together at once.
This is what I started out with, it's a workbench style table that has served us well for many purposes but has been sitting in the garage collecting dust for quite some time. As you can see, it's not in the best of shape though it is very sturdy.
The first thing I did was use a plastic paint scraper and quickly scraped all of the dirt and loose paint off of the top. That took quite some time but was definitely worth it. Then, I found some black satin paint and repainted the top. Right as I was getting close to the opposite end with the paint I felt like it needed an extra something and remembered the chalkboard spray paint I had in the closet, so I broke it out and finished the last one and a half feet with the chalkboard paint.
You can see in the above picture where the black paint ends and the chalkboard begins. It's a good sized message board for the house. The bottom half was still ugly though and I didn't have the tools nor the supplies to make doors. Soooo, I got an old shower curtain that was hiding in the back of the closet and started cutting it up. Luckily the shower curtain was exactly double the length of the table so I was able to cut in half and then into several panels. I just used hot glue around the edges to attach the curtain. But, again, it still looked like it needed something. That's when I saw the left over molding hanging from the rafters in the garage. I quickly cut it down to size with my trusty hacksaw and attached the pieces, again, with hot glue. I still hadn't cut out my corner piece in the above picture, so you'll have to excuse that. It looks nice though, doesn't it? Of course, I still felt like it was missing something so I got out my itty bitty paint brush and painted "messages" at the top of the chalkboard.
Friday, January 18, 2013
Date Night In
I am a firm believer in having a date night or some form of spending time with your significant other. It helps the relationship grow, especially when you have children. Brandon and I rarely get any time together alone and I really feel like that's important- not just for us but for every couple. Time alone without the kids that is. It's just not the same thing with them.
So I managed to get a free night together tonight even though I don't get off of work until 11 and he doesn't get off till 11:30, we're still going to spend time together. Of course, as always, our budget is too tight to be going out anywhere so we're going to stay home and do a date night in. I'm planning on a dinner, a movie, and probably a game of chess (it's actually really competitive game between the two of us :))
Here's the Menu:
Stuffed pork chops
garlic bacon wrapped asparagus
hassleback potatoes
chocolate dipped potato chips
We love food and cooking together. I had to adapt some of these recipes from others and some I just kind of winged it on to be honest, I don't always use recipes on a simple project. For example, chocolate dipped potato chips- I kind of figured that one out on sight as I know how to melt chocolate haha.
The Stuffed Pork Chops

I adapted my recipe from this one, though I think hers is probably prettier than mine. I always use thick cut pork chops when making this, the thin ones are dry when cooked and annoy me greatly. You can also substitute chicken for this- I've done that before as well. Just wrap it in bacon if you use chicken- trust me. Also, either use boneless or de-bone what you have. Then you take a very sharp knife and slice into the thickness of the chop, creating a pocket in the middle. Per chop I use about 3-4 slices off of a small block of mozzarella, about an 1/8 of a cup of cooked spinach, roasted red bell pepper pieces and just a bit of garlic to stuff it. I then sprinkled my chops with salt and pepper to taste and begin cooking them, like a sear, on the stove top- finishing in the oven.
Hassleback Potatoes

For these I use whatever cheese I have available, but first, after slicing them and baking them till brown I broil them, to get the extra crispiness, remove and add cheese and then broil again to melt the cheese. I'll be using mozzarella for these tonight.
Bacon Wrapped Asparagus

These are simply asparagus spears (trimmed and cleaned) wrapped in bacon and cooked in a skillet till the bacon is crisp with a little garlic and oil. I love these still crunchy, but can't stand them soft, they are really delicious and not something we do often at all.
Chocolate Dipped Potato Chips

These are going to be our dessert. I love these, they're the perfect amount of sweet and salty. Again, they're potato chips (ridges!) dipped in chocolate, it's simple. Unless you're not good at melting chocolate down. I use the microwave a few seconds at a time and stirring between until smooth.
This should be awesome. What do you guys think about the menu? I think it appears to be a lot of work and seems elegant but it's really quite easy and a quick meal. It also includes all the things we love. Believe me I had to think for a long time on what to serve before I settled on pork... we eat a lot of sea food and I considered using tilapia in place of the pork but opted for the cheaper of the two.
So I managed to get a free night together tonight even though I don't get off of work until 11 and he doesn't get off till 11:30, we're still going to spend time together. Of course, as always, our budget is too tight to be going out anywhere so we're going to stay home and do a date night in. I'm planning on a dinner, a movie, and probably a game of chess (it's actually really competitive game between the two of us :))
Here's the Menu:
Stuffed pork chops
garlic bacon wrapped asparagus
hassleback potatoes
chocolate dipped potato chips
We love food and cooking together. I had to adapt some of these recipes from others and some I just kind of winged it on to be honest, I don't always use recipes on a simple project. For example, chocolate dipped potato chips- I kind of figured that one out on sight as I know how to melt chocolate haha.
The Stuffed Pork Chops
I adapted my recipe from this one, though I think hers is probably prettier than mine. I always use thick cut pork chops when making this, the thin ones are dry when cooked and annoy me greatly. You can also substitute chicken for this- I've done that before as well. Just wrap it in bacon if you use chicken- trust me. Also, either use boneless or de-bone what you have. Then you take a very sharp knife and slice into the thickness of the chop, creating a pocket in the middle. Per chop I use about 3-4 slices off of a small block of mozzarella, about an 1/8 of a cup of cooked spinach, roasted red bell pepper pieces and just a bit of garlic to stuff it. I then sprinkled my chops with salt and pepper to taste and begin cooking them, like a sear, on the stove top- finishing in the oven.
Hassleback Potatoes
For these I use whatever cheese I have available, but first, after slicing them and baking them till brown I broil them, to get the extra crispiness, remove and add cheese and then broil again to melt the cheese. I'll be using mozzarella for these tonight.
Bacon Wrapped Asparagus
These are simply asparagus spears (trimmed and cleaned) wrapped in bacon and cooked in a skillet till the bacon is crisp with a little garlic and oil. I love these still crunchy, but can't stand them soft, they are really delicious and not something we do often at all.
Chocolate Dipped Potato Chips
These are going to be our dessert. I love these, they're the perfect amount of sweet and salty. Again, they're potato chips (ridges!) dipped in chocolate, it's simple. Unless you're not good at melting chocolate down. I use the microwave a few seconds at a time and stirring between until smooth.
This should be awesome. What do you guys think about the menu? I think it appears to be a lot of work and seems elegant but it's really quite easy and a quick meal. It also includes all the things we love. Believe me I had to think for a long time on what to serve before I settled on pork... we eat a lot of sea food and I considered using tilapia in place of the pork but opted for the cheaper of the two.
Valentine's Day
Like my mother, I decorate for everything. I don't know why I do it, I just do. This includes Valentine's Day. I normally don't get into Valentine's Day but this year I'm going to make some decorations for it, might as well. I don't have any any more- therefore, I need some. This is the way I feel about holiday decorations.
Yarn Wrapped Letters:

I love yarn wrapped letters, and these letters from My Sister's Suitcase are really cute and perfect for Valentine's Day! However, I'm all about saving money and I would change this slightly by using cardboard letters. To get the thickness with cardboard all you need to do is cut out the same shape repeatedly, stack them together, and glue. No one is going to be able to tell, the cardboard will be covered in yarn. If you really want to be sure the cardboard is completely covered, paint it in a corresponding color. At My Sister's Suitcase she also used cardboard, but she used 3D cardboard letters. I don't know that our craft store here sells these, but I'd much rather make mine, I'm too much of a penny pincher. There's also another trick she used that I'd definitely have to agree with. On the ends of the letters that you're unable to wrap you're probably going to have to glue the yarn down. In any case you might want to do that every couple of inches on the flat sides as well to ensure stability in your project. The link will take you straight to her project if you need more of a visual.


I love these I love you blocks from I Candy Handmade, they're easily handmade and go well with other V-Day decorations. The sign behind them says "I love us". I'm definitely going to do these as well. They're also pretty durable and will last a long time, making them perfect for my V-Day Deco box. Wood blocks are pretty easily found/ made and I've definitely got the skills and paint to make them!

These felt arrows from Carolyn's Homework can be made with cheap felt and twigs even with very little crafting skill. If you're going to use hot glue with felt, be careful. Depending on the thickness of the felt it may or may not do one of two things (or sometimes both). It will seep through the felt and burn your fingers and/or leave a flat kind of ugly spot on the outside so be careful with these!

This envelope from The Crafting Chicks, was love at first sight for me. I love it so much. However, I don't currently have stairs to hang it on and I am bent on the little heart door hangers above. So, my solution for what to do with this envelope, once made, is to hang it in the middle of my Valentine's Door Wreath featured below. With just a little tweaking on the colors it will be perfect and so cute. I love this. Again, click the link for a full tutorial. I love these guys. Did I mention how cheap felt is and how easy it is to work with? I think it's going to add the perfect "kick" to my wreath.

Wow, I love argyle and this wreath from Mine for the Making is definitely for me. I'm going to have to make this, without a doubt. I still like a little more fullness to my wreaths, if that makes any sense and that's why I'm going to add the felt envelope from above. Again, when using yarn to wrap something, stop and add a little glue every couple inches, or rows, to add stability. I don't know how the boys in the house are going to feel about all these hearts! :)
Tissue Paper Candle Holders:

I'm not sure who to give credit to for the tissue paper candle holders, but it's basically just tissue paper and mod podge (the link will take you to the recipe) over a glass jar with a votive inside. I suggest using battery operated tea lights to minimize fire hazard :)

I really do like this board from Infarrantly Creative, the numbers are actually Hershey's kisses. However, this board is actually a bit harder to make than the previous projects, by far. We currently don't have an electric drill so I'm going to have to find another way to do this, I'm just not sure how yet. I'm sure I'll be able to do it though, no problem. I'll definitely let you guys know when I'm done and the entire project is completed- I'll include a step by step guide as well for everyone.
I've also seen some adorable garland's and I like them all but I haven't seen one yet that I felt was really my style so I'm going to put a hold on that one and wait to see what I can come up with on my own. I'll most likely be using paint chips and pom pom's but I'll let you guys know what I decide on!
UPDATE: All I've managed to complete so far on this is the painted bottles, will be posting pictures soon!
Yarn Wrapped Letters:
I love yarn wrapped letters, and these letters from My Sister's Suitcase are really cute and perfect for Valentine's Day! However, I'm all about saving money and I would change this slightly by using cardboard letters. To get the thickness with cardboard all you need to do is cut out the same shape repeatedly, stack them together, and glue. No one is going to be able to tell, the cardboard will be covered in yarn. If you really want to be sure the cardboard is completely covered, paint it in a corresponding color. At My Sister's Suitcase she also used cardboard, but she used 3D cardboard letters. I don't know that our craft store here sells these, but I'd much rather make mine, I'm too much of a penny pincher. There's also another trick she used that I'd definitely have to agree with. On the ends of the letters that you're unable to wrap you're probably going to have to glue the yarn down. In any case you might want to do that every couple of inches on the flat sides as well to ensure stability in your project. The link will take you straight to her project if you need more of a visual.

Aren't these cute little heart ornaments from The Creative Place adorable?! I am absolutely in love with these. The link will again take you to a full tutorial. I love these as door hangers and will probably hang them on every door in my house. I'm also seriously considering putting a few drops of essential oil inside, probably lavender.
These decorative bottles are actually left over sparkling cider bottles from G*Rated. All they did was take a hot glue gun and "write" the words on the bottles, then paint them. The tops are wrapped with twine. These are fun, easy, and cheap which everyone knows I love. I'll definitely be adding these to my Valentine's Deco box.
I love these I love you blocks from I Candy Handmade, they're easily handmade and go well with other V-Day decorations. The sign behind them says "I love us". I'm definitely going to do these as well. They're also pretty durable and will last a long time, making them perfect for my V-Day Deco box. Wood blocks are pretty easily found/ made and I've definitely got the skills and paint to make them!
These felt arrows from Carolyn's Homework can be made with cheap felt and twigs even with very little crafting skill. If you're going to use hot glue with felt, be careful. Depending on the thickness of the felt it may or may not do one of two things (or sometimes both). It will seep through the felt and burn your fingers and/or leave a flat kind of ugly spot on the outside so be careful with these!
This envelope from The Crafting Chicks, was love at first sight for me. I love it so much. However, I don't currently have stairs to hang it on and I am bent on the little heart door hangers above. So, my solution for what to do with this envelope, once made, is to hang it in the middle of my Valentine's Door Wreath featured below. With just a little tweaking on the colors it will be perfect and so cute. I love this. Again, click the link for a full tutorial. I love these guys. Did I mention how cheap felt is and how easy it is to work with? I think it's going to add the perfect "kick" to my wreath.

Wow, I love argyle and this wreath from Mine for the Making is definitely for me. I'm going to have to make this, without a doubt. I still like a little more fullness to my wreaths, if that makes any sense and that's why I'm going to add the felt envelope from above. Again, when using yarn to wrap something, stop and add a little glue every couple inches, or rows, to add stability. I don't know how the boys in the house are going to feel about all these hearts! :)
Tissue Paper Candle Holders:
I'm not sure who to give credit to for the tissue paper candle holders, but it's basically just tissue paper and mod podge (the link will take you to the recipe) over a glass jar with a votive inside. I suggest using battery operated tea lights to minimize fire hazard :)
I really do like this board from Infarrantly Creative, the numbers are actually Hershey's kisses. However, this board is actually a bit harder to make than the previous projects, by far. We currently don't have an electric drill so I'm going to have to find another way to do this, I'm just not sure how yet. I'm sure I'll be able to do it though, no problem. I'll definitely let you guys know when I'm done and the entire project is completed- I'll include a step by step guide as well for everyone.
I've also seen some adorable garland's and I like them all but I haven't seen one yet that I felt was really my style so I'm going to put a hold on that one and wait to see what I can come up with on my own. I'll most likely be using paint chips and pom pom's but I'll let you guys know what I decide on!
UPDATE: All I've managed to complete so far on this is the painted bottles, will be posting pictures soon!
Drinking Glasses
We've all seen the pins and the videos illustrating how to turn wine bottles or any other type of glass bottle into drinking glasses, or storage. I decided to try it myself. Let me start off by saying that it was easy, but not as easy as the people in the videos made it look! I destroyed several bottles during this process. No, I do not drink this much. Please keep in mind that the ridiculous amount of liquor bottles you'll see me use in crafts did not come from me. The house was a bachelor pad by definition before I moved in with college age guys living here. There's quite a stash of liquor bottles ha ha ha. I couldn't help but try to make these.
Here are the basics of the project, you wrap yarn around your bottle, tie it tight and then slip it back off to soak in acetone. I used nail polish remover, which is acetone if you didn't know, it's just not pure. The table top they're sitting on, if you're wondering, is one I transformed the same night, it will be the start in another post. Anyway, after the yarn is soaked in acetone you slip it back onto the bottle and light it on fire. Slowly turn the bottle until the flame starts to die down and then submerge it in ice cold water. This causes stress on the bottle therefore causing it to crack along the line of yarn. I shouldn't have to tell you this but this project could go awry very easily and I am not responsible for any damage to self, home, or anything else if you mess it up.

I also recommend that if you have a bottle you're just absolutely bent on using, try this several times on other bottles first till you get the hang of it. There are several in my trash can from failed attempts. The breaks aren't always clean either as you can see they're sometimes slightly jagged. Although, I must say that for some reason in my pictures they look way more jagged than they are. I also pretty well destroyed the labels on all four.

Something else you should take note of is that the thickness of the bottle counts. The thicker the bottle the harder it is to snap. I had a grey goose bottle that didn't snap at all but shattered (going to try those again later now that I have a better feel for the project). The Jameson bottles above had to have the process done to them several times. Yet the Skyy bottle (the blue one) was the easiest with the cleanest break. I think it's also the prettiest.

Here are the basics of the project, you wrap yarn around your bottle, tie it tight and then slip it back off to soak in acetone. I used nail polish remover, which is acetone if you didn't know, it's just not pure. The table top they're sitting on, if you're wondering, is one I transformed the same night, it will be the start in another post. Anyway, after the yarn is soaked in acetone you slip it back onto the bottle and light it on fire. Slowly turn the bottle until the flame starts to die down and then submerge it in ice cold water. This causes stress on the bottle therefore causing it to crack along the line of yarn. I shouldn't have to tell you this but this project could go awry very easily and I am not responsible for any damage to self, home, or anything else if you mess it up.
I also recommend that if you have a bottle you're just absolutely bent on using, try this several times on other bottles first till you get the hang of it. There are several in my trash can from failed attempts. The breaks aren't always clean either as you can see they're sometimes slightly jagged. Although, I must say that for some reason in my pictures they look way more jagged than they are. I also pretty well destroyed the labels on all four.
Something else you should take note of is that the thickness of the bottle counts. The thicker the bottle the harder it is to snap. I had a grey goose bottle that didn't snap at all but shattered (going to try those again later now that I have a better feel for the project). The Jameson bottles above had to have the process done to them several times. Yet the Skyy bottle (the blue one) was the easiest with the cleanest break. I think it's also the prettiest.
Now, I'll also have to take some sand paper and sand down the squared parts of the glasses but they're really not that sharp, and I'll have to remove the labels obviously. I had hoped to keep the labels on but it just didn't work out that way. Another interesting side note would be that the Jameson bottles also cracked clearly on both sides of my yarn. No other bottle did that quite like the Jameson. It was unusual though I have no idea why- what do you guys think? Comment and follow!
Tuesday, January 15, 2013
Update on the Girls' Bedroom
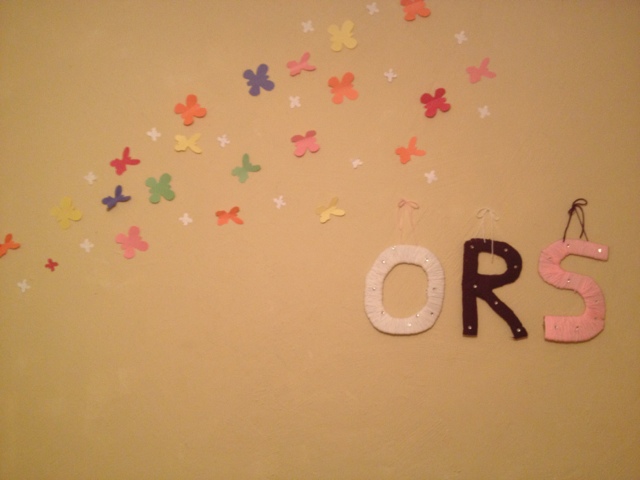
I've done some more to Livvy and Tobi's bedroom since the last post and I figured I'd stop by and show you guys. The trolls were bought at Goodwill, I paid four dollars total for all of them and all but one had on their original outfits. I couldn't resist them, they take me back to my childhood. I also spent five bucks on the cute princess poster at Walmart, I couldn't resist it because I got Bubba one too and it's only fair you know. The cursive "love" wall decal looks like it was made of metal but it's really just cardboard that I cut out and painted black and then painted over with a silver glaze. The shelf belonged to their Aunt Megan, Brandon's sister- she left it at the house when she and her husband moved out.


I felt like the yarn initials I showed off in another post weren't quite done, I felt like they were missing something and for a few bucks I got a baggie of little plastic rhinestones from Walmart that I glued on to "pretty them up"- the girls love when things sparkle!


So, what do you guys think? Got any other ideas for me? I think I'm gonna be finished till I can get more firniture moved in. Comment and follow!


I felt like the yarn initials I showed off in another post weren't quite done, I felt like they were missing something and for a few bucks I got a baggie of little plastic rhinestones from Walmart that I glued on to "pretty them up"- the girls love when things sparkle!

So, what do you guys think? Got any other ideas for me? I think I'm gonna be finished till I can get more firniture moved in. Comment and follow!
Subscribe to:
Posts (Atom)